It's no Paloma's Nest bowl:
Sourced from Paloma's Shop
And it's no Love Grows By Giving ring dish:
Sourced from Love Grows' website.
And sadly, it's certainly no Prince Design UK bird bowl:
But it's my bowl, and I made it with my own two hands. Let's start at the beginning shall we?
Supplies:
Sculpy pearlescent clay (I bought two, but only used one - they were less than a dollar a piece)
Clear acrylic letter stamps
Doily (hand crocheted by my great grandmother)
I laid out a colorful Cheesecake factory bag on the table so there was more contrast in the instructions. As a side effect, it also helped shield the table from ground in pearlescent clay bits. (*Side Note: Although Cheesecake factory gives you WAY TOO MUCH food, I really enjoyed the goat cheese pizza that I had there, brought home in this bag, and then ate for the next 6 days.)
After warming up the clay a little bit and kneading it in my hand, I started to use the heel of my hand to flatten the clay into a circle.
When I was fairly satisfied with the uniformity of the thickness and the general shape, I took a picture of it next to a pen so that you could get some perspective on its relative size.
I love when it looked like this - a blank canvas, begging to be adorned! And adorn I did. I use the I, D, and O letters to spell out a secret message in the clay (inspiration from Paloma!)
Then I used the doily to imprint a sweet pattern on portions of the flattened disc (Inspired by Love Grows and Prince Design UK!)
The hand crocheted doily imprint was a hot mess. Seriously. Ewww.
Back to square one! Knead it back down.
I got the bright idea to use a paper doily (from a project that I've been procrastinating about) for the second go at it.
Ding, ding, ding! We have a winner! Much better, if I do say so myself. Hahahaha, I do. Carry on.
I decided at the last minute to prick a hole so that I could add a ribbon or an ornament hook later. A tooth pick did the trick quite nicely.
To get the dish to bake in a curved bowl shape, I rigged a piece of aluminum foil into an oven safe bowl and then baked the clay according the package instructions.
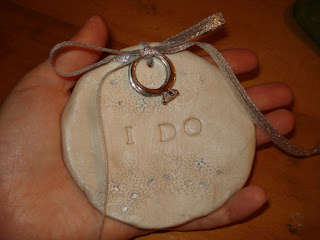
To finish the bowl, I used a silver sharpie pen to highlight some of the doily impressions and tied a bit of silver ribbon to the top. I feel "meh" about the final product - kindof like it was a crafting fail. Looking back, I might have left it to bake flat because I think that it spread a little unevenly in my rudimentary bowl contraption. After I looked at this picture a bit, I decided that the edges needed to be more uniform. I took a nail file to it and it really started to look sharper! I pretty much ruined my nail file though, so the rest will have to wait until I get my hands on a sheet of find grit sand paper to finish the job.
Unfortunately, we don't have any chubby little ring bearer paws to hold onto this, so I think that the finished product will merely be a prop for some professional ring pictures. I'm pretty pleased considering that the whole project was less than a dollar!
Are you using a ring bowl or dish for your wedding? Are you planning on using it in your home after the wedding?








2 comments:
Love the doily idea! Genius!
Amazing!
Post a Comment